
With x-AI, it isn't a debate. x-AI works in both Code First and Database First modes. The decision is simple. If you already have a database with a full schema and test data ready to go, you go Database First. If you don't yet have a database, then the Code First approach is the way to go.
All of our tutorials have both the Code First and Database First instructions. Just skip over the steps that don't apply. If you want to follow the Code First tutorial, skip the Database First (Step 2) and vice-versa (Skip Step 1 if following database first).
Building an MVC / Razor Pages Solution - Code First or Database First
In this page, we describe the steps needed to generate an MVC / Razor Pages solution in xAI using Microsoft Entity Framework, SQL Server and the C# (C Sharp) language.
These samples can run on Windows, Linux and Mac platforms. The xAI extension (the development environment) is for Windows 10/11 only as it runs in Microsoft Visual Studio for Windows 2019/2022 and not Microsoft Visual Studio Code.
Instructions here are for both Code First and Database First approaches. The Database First approach is where you already have an existing database and can import the schema information into the xAI Extension.
The Code First approach is where you do not have an existing database. You basically need to type in the definitions for all the tables or import them from a CSV file that has been pre-prepared.
Where indicated, you can skip the steps that don't apply to your selected approach, otherwise you perform each of the following steps in sequence.
To make this as easy to follow as possible, the same database information is used for both the Code First and Database First approaches.
Tutorial 2 - Building an MVC Application
Step 1 - (Both Code First and Database First)
1. Open Microsoft Visual Studio 2019 or 2023.
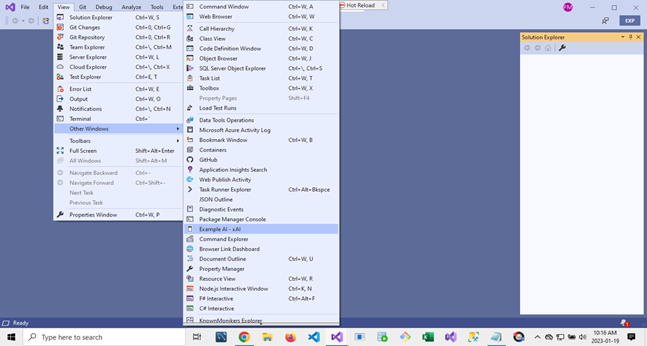
2. Click on the main menu bar at the top of the screen and select View.
3. Click on Other Windows.
4. Navigate to the flyout menu and select Example AI - xAI.
Step 2
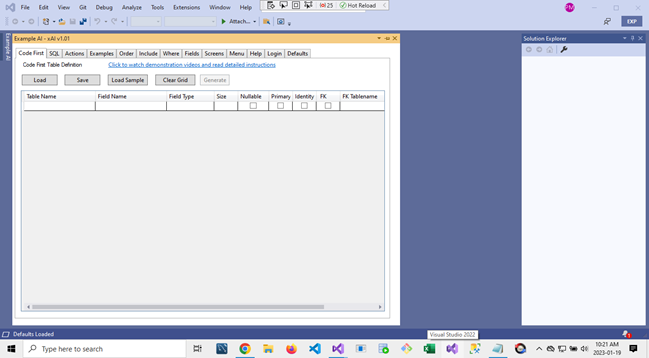
The xAI Tool window will appear as shown below.
Step 3
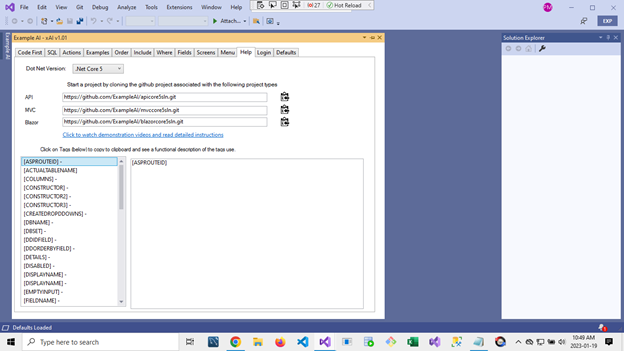
1. Click on the Help Tab.
2. Select the Dot Net Version (5,6, or 7)
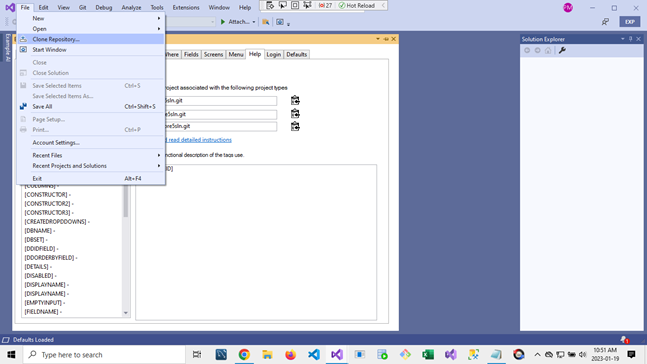
3. We are building an MVC application. Click on the icon next to the MVC line to copy the GitHub location to the clipboard.
Step 4
1. Click on the File menu at the top of the screen.
2. Select Clone Project
Note: We will clone an -empty- project from the Example AI GitHub repository. This eliminates most manual setup steps when creating a project.
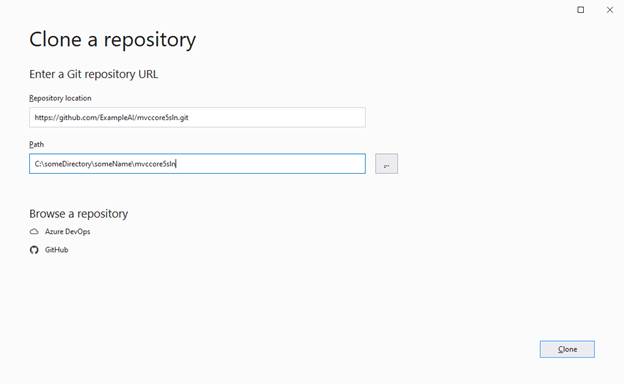
Step 5
1. The following Visual Studio screen will appear.
2. Paste the text you copied to the clipboard into the Repository location box.
3. Provide a path to the project. This may be anywhere you choose to set the location to.
4. Click the Clone button.
5. This will clone the project into the location you specified.
Note: The GitHub manager window may appear. You can dismiss this window. (Click the X on the top right of the border to close it.)
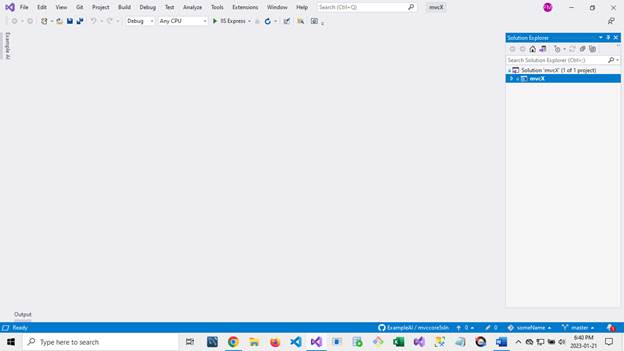
Step 6
1. Once Visual Studio has finished loading the project, click on the solution filename (mvccore5sln.sln) to open the solution.
Note: In xAI we work with solutions and not individual projects. Solutions contain multiple projects, including test projects.
Step 7 - (Code First only - Skip to step 9 if using Database First)
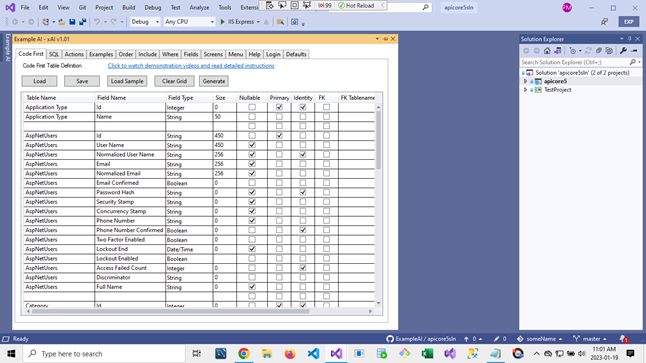
1. If the example AI window has collapsed, click on the side bar Tab to expand it.
2. If not selected, click on the Code First Tab to begin a Code First project.
3. To skip the step of typing in the Table Names and field names, you can click on the Load Sample button. The grid will fill with all the information needed to generate a Code First solution.
4. Alternatively, you can type in the necessary information or load from a csv file that has been prepared previously. (A video with instructions on using the Code First Tab is available in the video library.)
5. Click the Generate button to create the classes. After a short delay, an alert box will pop up when the classes have been generated.
Step 8 - (Code First only - Skip to step 9 if using Database First)
If you already created the codefirst database in the API Code First tutorial for xAI, skip to step 9b. You have already defined the fields and tables and run a migration and applied the changes to the database.
1. Once the classes have been generated, the next step is to change the default database name in the appsettings.json file.
2. By default, it-s xaidemo. (The name comes from the GitHub image).
3. You may want to change it but that-s only necessary if you have an existing database named xaidemo on your server.
4. For this example, we change it to codefirst.
5. The next step is to select Tools - NuGet Package Manager - Package Manager Console.
6. We now do our first database migration by typing in add-migration initial.
7. The system will build the project and, in a moment, or so you will get a message indicating:
Build started... followed by
Build succeeded.
8. Finally, you enter - Update database and press the return button. After a short pause the database will be created, and all tables and keys set.
Note: If you want to keep the database migration paths intact, you can use SQL Server Management Studio to add, edit or delete records but don't use it to make changes to the schema. Otherwise, you will lose the Entity Framework capability to reverse migrations.
Just make schema changes in the Code First Tab and/or the underlying classes in the Models directory of the application.
Here, we pick up as if this was a Database First Project.

Step 9a - (Code First specific instructions.)
1. Click on the SQL Tab.
The image below shows the SQL Tab screen.

2. The connection string field is pre-populated (It-s set in the Defaults Tab).
3. The setting is appropriate for most situations where you have a local database installed on your machine. If you need to connect to a remote server, you can consult your database support team for the exact connection string.
5. The dropdown next to the Connect button will fill with the names of the databases on your machine.
6. Click on the database name called codefirst.
Step 9b - (Database First specific instructions.)
1. Click on the SQL Tab.
The image below shows the SQL Tab screen.
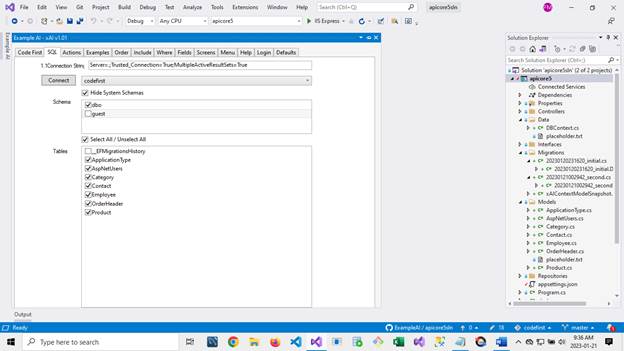
2. The connection string field is pre-populated (It-s set in the Default Tab).
3. The setting is appropriate for most situations where you have a local database installed on your machine. If you need to connect to a remote server, you can consult your database support team for the exact connection string.
4. Press the Connect button.
5. The dropdown next to the Connect button will fill with the names of the databases on your machine.
6. Click on the database name called codefirst.
Step 10
1. In this example we have unchecked the guest schema (nothing is in this database schema anyways), and we have unchecked the EFMigrations table. Nothing prevents us from building using the EFMigrations table, we are just demonstrating that you can freely choose the tables you wish to include in your solution.
Step 11
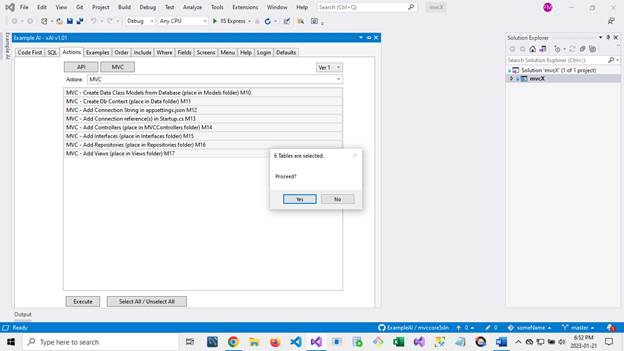
1. Click on the Actions Tab. The API pipeline will be pre-selected. (The pipeline is a series of steps that are executed one after another in the order of the pipeline elements.).
2. Click on MVC button to select the MVC pipeline.
3. Click on the Select All / Deselect All button. All the elements in the pipeline will be selected.
4. Click on the Execute button to perform all the selected actions in the pipeline.
5. Before going ahead, you will be prompted do you wish to proceed. The banner at the top of the dialog tells you how many tables have been selected as a precaution in case you don-t wish to include so many tables in the project.
6. Choose Yes to proceed.
Step 12
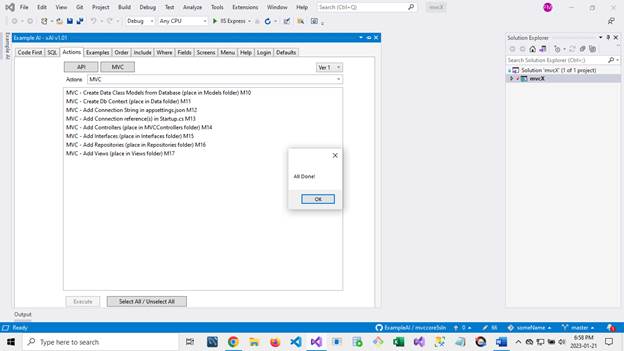
1. The program will go ahead and perform all the tasks in the pipeline. A dialog box with progress bar will provide detailed information as the program proceeds. (This information is also logged to the debug window).
2. In most cases, it should take less than a minute to build the MVC project.
3. Once the program has completed, an All Done! message box will pop up.
4. -Click OK to dismiss the dialog.
Step 13
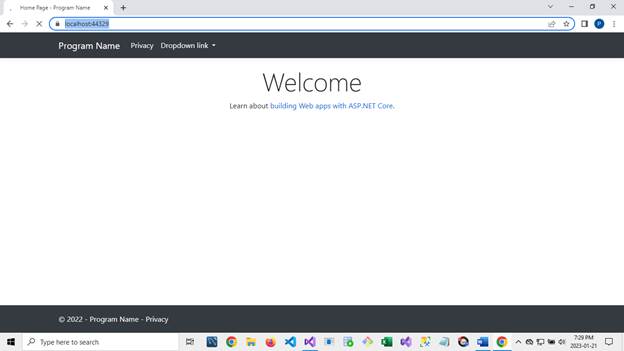
1. Build and run the project (Click Debug, Start Debugging or F5, or Debug, Start without Debugging (Shift F5).
2. Depending upon the number of tables and the complexity of the project, building may take a few minutes (generally quite a bit longer than the generation time).
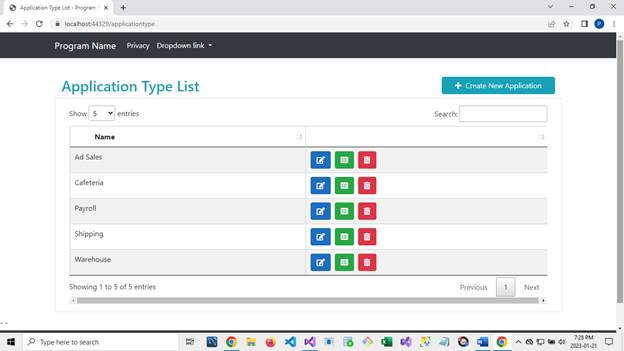
3. The Microsoft Default Main Page will appear (/index) as shown below.
4. Click on the menu bar item Dropdown link and select the choice Application Type.
Step 14
1. You may now go through all the options, and test out the application.
Step 15
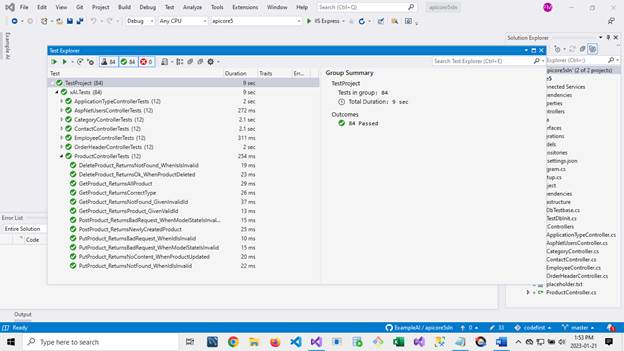
1. We have also generated all the tests using x-Unit for the MVC application. (The x-Unit references came with the project clone operation from GitHub). You can now click on View and then select the Test Explorer. After running all the tests, you will see the success status of the running all the tests.
2. Depending upon the number of tables and the size of the project, it may take a few minutes to run all the tests. You should expect them to all run successfully as shown below.
Note: You can go ahead and run all the tests before adding or changing data to the database. Since we are testing the controllers and not SQL Server or Entity Framework itself, we mock the data using the Entity Framework in Memory Database.
Step 16
1. At this point you have successfully generated the API but may now do a little -fine-tuning-.
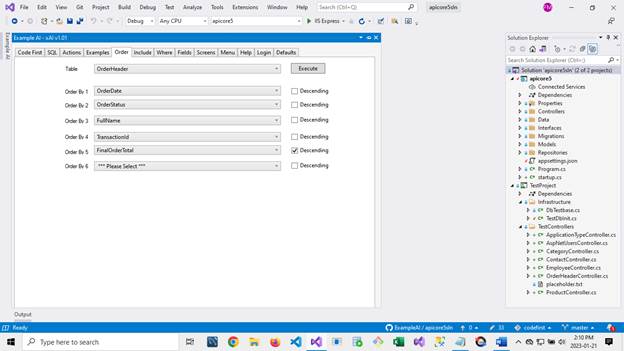
2. Skip over the Examples Tab and select the Order Tab.
By default, xAI will automatically sort the output of the MVC Index page associated with a table based upon the values set in the default settings.
Note: This default is a single sort order, typically ID ascending or first Alpha Field ascending which is the first alpha/character field in the table ordinal order.
However, if the default isn't enough, you may select from up to 6 sort orders with a mix of ascending order and descending order.
For example, in the screen below, we are sorting the lists of the Order Header by the Order Date field, Order Status field, Full Name field, Transaction Id field and then the Final Order Total field Descending.
3. Select the Order table in the Order dropdown.
4. Select the order sequence in the boxes as shown.
5. Click on the Execute button, and in just a second or two, the system will replace the order criteria according to the selections made.
Step 17
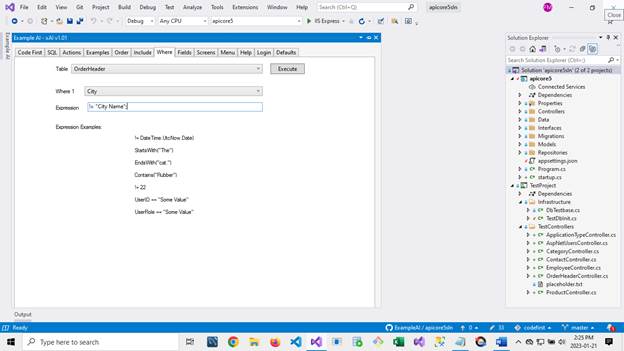
1. Click on the Where Tab. This tab will allow you to change the selection criteria for the records.
2. Select the table from the table dropdown.
3. Then, select the field from the When 1 dropdown.
4. Enter the criterion in the Expression box.
Note: The criterion is basically the >= expression without the brackets. The examples on the form show the correct syntax to use.
6. Click on the Execute button to change the Where clause for the table.
7. This takes just a second or so and will make the change to the database select logic.
Note: This is embedded in the code and should be thought of as a global selection filter.
This is for if you wish to include specific selection / filtering logic that applies to all reads. Typically this is done for permission purposes (is all manager and assistant managers) but may be set to granular values for testing (as in the case of only return a specific record or series of records).
Step 18
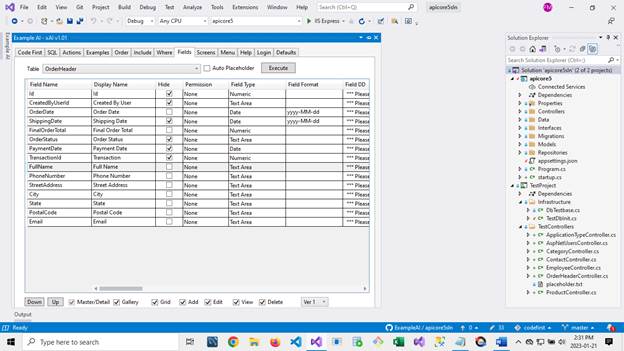
1. Click on the Fields Tab.
2. This tab allows the user to select which fields to put in results and accepts and in what order.
3. Additionally, there are specific values for masks and field formatting.
4. Click on the Execute button once you have made your selections.
(A video with instructions on using the Fields Tab is available in the video library.
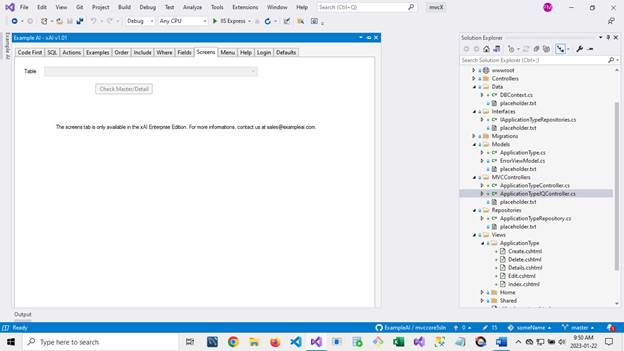
Step 19 - The Screens Tab
Note: This is pre-release documentation and the screens tab will be provided at a later date.
Step 20 - The Menu Tab
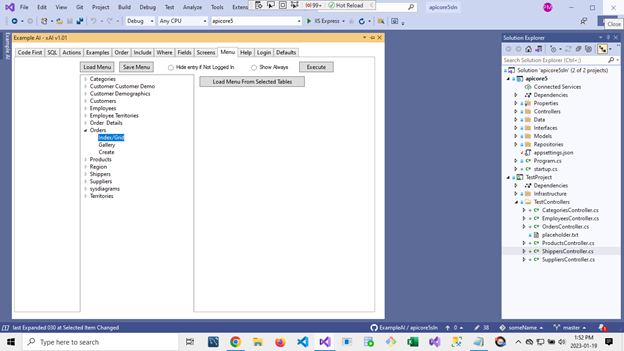
1. The Menu Tab allows you to create a menu for your application. By default it will be an alphabetical list of all the table names presented in a dropdown.
2. Click the Load Menu from Selected Tables button. All the table names will present themselves in the tree view at the left of the screen.
3. Click on the Execute button to create the menu.
4. Run the program and test.
Note: A video with instructions on using the Code First Tab is available in the video library.
At this point you have completed the MVC / Razor Pages tutorial. Information on additional features is available in the video library.
© 2023 Example AI Inc. All rights reserved. - 1 (833) 979-0277